
The Tower
Using the Tower
To use the Tower in your game, follow these instructions.
- Make sure you have three AA batteries properly inserted into the bottom of the Tower.
- Before starting your game, remove all the seals from the Tower. This will ensure no skulls are left in the Tower from a previous game.
- Turn the Tower on using the switch on the bottom of the Tower.*
- Place the Tower upright in the center of the game board.
- The app will guide you through the remainder of setup after you press the “Start New Game” button.
*NOTE: The rulebook says the Tower levels will rotate after you turn it on. They will not. This happens during setup after you press the “Start New Game” button.
Tower Warranty
We have a 2-year warranty against defect under normal wear-and-tear under which we will replace the Tower for free. We will ship you a replacement Tower along with a return label and require that you return the damaged Tower in the same box. For lost or broken Towers, we will replace at cost plus shipping plus a $10 handling fee. We offer replacement parts for all other components free of charge..
Tower Care
Handling: Use care when handling the Tower. It should not get damaged from ordinary use. However, it might get damaged by dropping it, getting it wet, placing foreign objects in it, or impeding the normal operation of the Tower levels.

Cleaning: Your Tower does not require regular maintenance. You can dust or gently clean the Tower using a damp cloth, but make sure not to drip water into the Tower.
Batteries: The Tower uses three AA batteries. Install batteries according to the diagram. Make sure that you only use 1.5V AA/L R6 size batteries and that they’re inserted correctly. You’ll get better results if you use new, fully charged batteries. Remove the batteries if you will not be using the Tower for an extended period of time, as it can lead to corrosion, which is basically corruption but for machines. Take care when removing the batteries – use your fingernail, or a non-metallic tool like a plastic guitar pick, lifting the positive ( +) side first. Never use anything sharp or metallic, as this might cause damage to the batteries, resulting in a short circuit or leakage.
Safety: The Tower has a system to shut down operation in the event something jams the level rotation. However, to avoid injury, you should not stick your fingers, hair, or other body parts in the Tower while the power is on. Be careful not to let your hair inadvertently dangle into any of the Tower openings.
Changing the Batteries mid-game
- As soon as you have finished any events that come up after a players turn, tap the three lines in the top right corner of the screen.
- In the lower left corner it will tell you when the game was last saved.
- Tap the Quit Game button.
- Tap Quit on the verification screen.
- Turn off the tower.
- Replace the batteries.
- Turn on the tower.
- Tap Continue Game.
- Tap Next.
- The app will resubscribe to the tower and let you know the game loaded successfully. It will not calibrate, so all the levels will stay in their current positions.
- Continue playing.
A behind the scenes look at the tower
originally posted as a campaign update
The last update we shared from the Tower design process was when Justin shared some “first shot” images back at the end of September, which honestly feels about five years ago because 2020 happened. So the team asked me to write another tower update to bring you up to speed on what’s been happening of late.
As Justin detailed in his post, First Shot is the first point in the project where we see actual plastic parts made from the moulds, and it marks the start of a long period of testing and modification that ends with the final production run. To start, here’s a picture of the current Tower prototype, which is officially called Engineering Prototype 2 (EP2 for short):
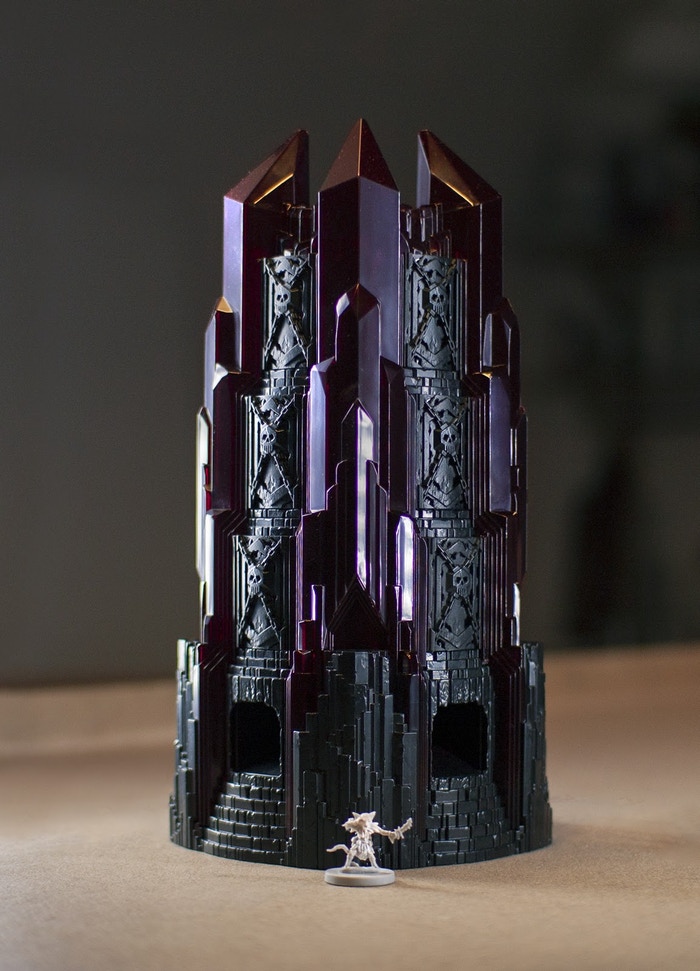
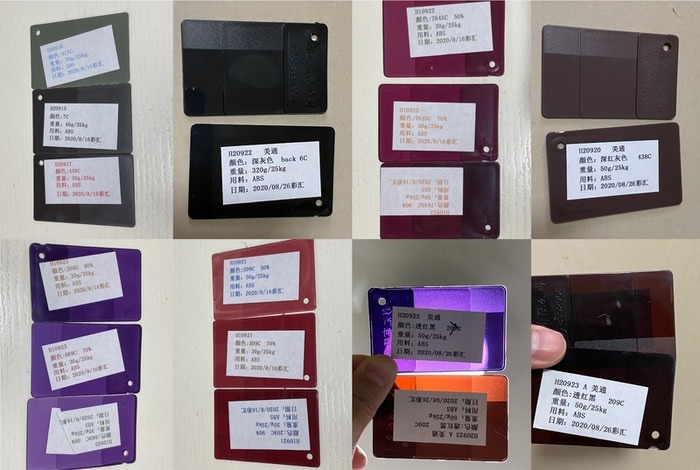
If you compare to the Tower in Justin’s update, you’ll see that we’ve gone through some colour changes and are currently favouring a blood-red, semi-transparent material for the crystal parts, and a very dark grey for the stone and doors. Colour is an entirely subjective issue, so it takes a lot of back and forth to come to a consensus. Jason, Lindsay and I spent a lot of time looking at colour swatches, considering things like light transmittance, contrast and how it fits with the palette of the other game components. But obviously the prime concern was to make it look entirely evil, for which red and black really can’t be beat.
If you read my last diary entry back in June you might remember that I was experimenting with natural stone textures for the outer shell. Details like this are another entirely subjective thing, so after a lot of back and forth with the team it was decided to only apply texture to the stone sections, leaving the crystal smooth. The result is a nice juxtaposition between the weathered rock and faceted crystal, making the Tower visually interesting to look at from all angles and chock full of lovely reflective surfaces. The Tower, sat alongside the incredible minis and luscious art of the printed components, is going to look simply stunning on your table.
(if anyone’s interested, I modelled the base forms in Rhino and Solidworks, then textured in ZBrush using brushes by Jonas Ronnegard & Daniel Thiger and Danny Carlone).
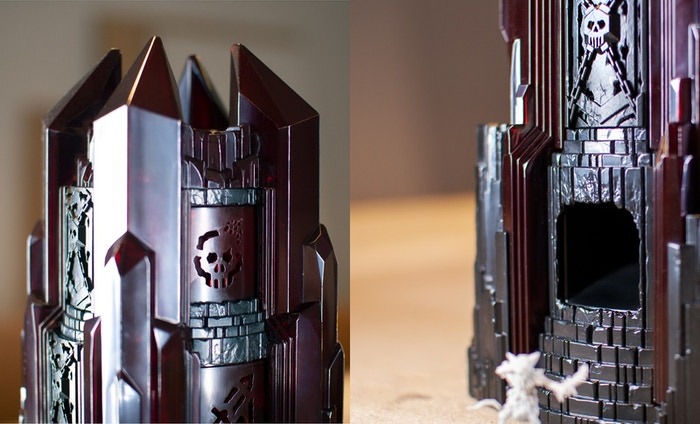
Next up I wanted to show you a small but important change to the seals, to demonstrate the test-and-iterate process we apply to the whole design, and also the commitment to quality that we want to deliver. An inherent risk with any rotating mechanism is jamming. Parts getting stuck where they shouldn’t, grinding everything to a halt. In our case, having a bunch of skulls rolling around inside the tower when the levels rotate could create opportunity for, say, a rogue jaw to get stuck on a ridge, or a cheekbone to wedge behind a protrusion. To ensure this doesn’t happen we do a heck of a lot of testing under the worst possible conditions (in this case absolutely filling the chutes behind the seals with skulls), and then engineer the parts so that everything still runs smoothly. All so that during the course of normal play you (hopefully) shouldn’t experience anything but normal operation. This is why you’ll notice the backs of the seals now have an extra semi-translucent part, creating a perfectly smooth surface. A small detail, but one that’s come from a lot of testing. Apply this methodology to the entire Tower and you’ll understand why complex projects like this can take time to get right.
Here’s a shot of the inside of the Tower. Just look at that lovely neat wiring. Figuring out wiring runs comes quite late in the day, once plastic parts are mostly locked. There are two ingredients to make good wiring. The first is to make sure that no rogue wires can get trapped or crushed during assembly. The second is to make it as easy as possible for the factory workers to route them correctly. We’re currently expecting to make about 800 Towers a day during production, so we need to make the assembly process as foolproof as possible.
Most of the other new developments to the internals are too small to see. We’re at the stage where we frequently talk in fractions-of-millimeters, slowly but surely finding and removing gaps, ridges, mismatched joints and weak points. All work that you’d never know happened, but without which the final thing just wouldn’t be as good.
In the photo you should also be able to see the white marking on top of the drums. These are the photo-reflector trigger points I talked about in my last update, to tell the Tower when each drum has rotated correctly. This system has undergone thousands of test rotations to make sure it’s accurate and reliable.

Speaking of testing…. Around November we were happy enough with the prototypes that we started to subject them to the rigorous testing required for the product to meet safety standards. The photo above shows an anechoic chamber, designed to measure electrical noise. Electrical circuits that do anything interesting also produce electrical noise (ie electromagnetic signals). Sometimes they do it intentionally (eg Bluetooth), other times it’s unintentional. If devices emit too much noise unintentionally they could interfere with other devices, or even with communications networks. To avoid this becoming a huge mess and making radio communication impossible there are regulations about how much noise a product can emit and at what frequencies.
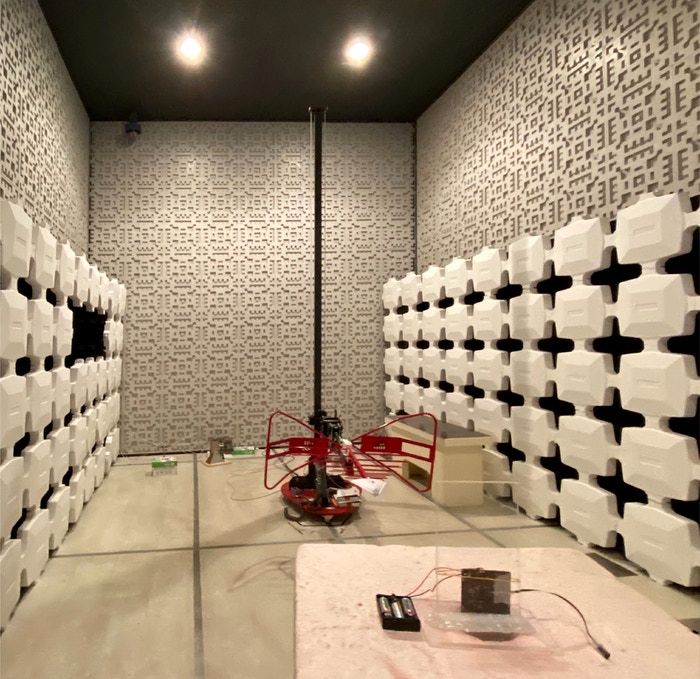
The test in the photo is measuring the total emissions of our circuit, both intentional and unintentional. The thing in red is the antenna. The patterns covering the walls are absorbing the radio waves from our circuit board (in the foreground of the photo), preventing reflections from interfering with the measurements. The resulting measurements are compared to the legal thresholds of various countries to make sure we’re compliant.
We’ve also been devoting a whole lot of time testing battery life, which involves creating a custom app that runs the tower for extended periods of time. We’re not quite ready to plant our flag as to exactly how many hours of playtime you’ll get on a fresh set of 3xAA batteries, as we still have some tweaks to make and some more tests to run, but things are looking good so far.
Staying with testing, we’ve also been subjecting the Tower to a suite of physical and chemical tests to make sure it’s safe and robust enough for typical use. These tests include things like dropping from various heights in multiple different orientations, as well as a batch of tests designed to measure strength. Imagine the thing you’ve been working on for years being abused in the most clinically torturous ways possible. Here’s a quick video of the testing, featuring, from left to right, tensile test (i.e., crushing), drop test (i.e., Tower goes splat), and compression test (i.e., pulling). This part makes me sad.
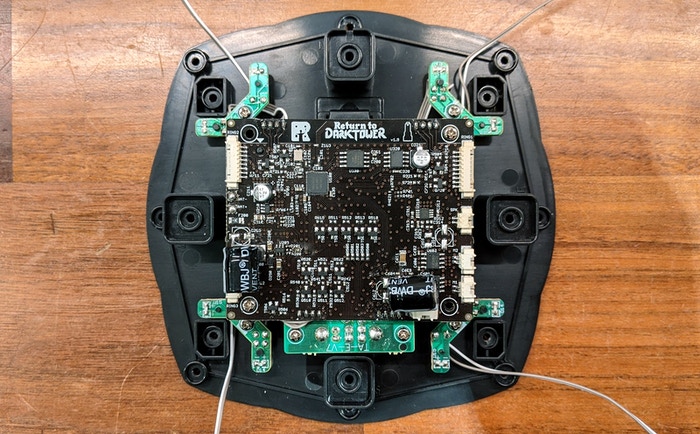
Here’s a shot of the current main circuit board design, which has undergone almost weekly development for most of last year. We’re still working on final refinements, to ensure we reach peak performance, reliability and battery life, but it’s pretty much ready to go. The four C shaped boards surrounding it each contain two small LEDs to light up the base, and the rectangular board below the main board contains the power slide switch. Everything will eventually be black, because this isn’t Return to Green Tower.
That’s probably enough for one update I think. I’ve purposely not talked about packaging, as this is large and exciting enough to deserve its own update very soon. I’ve also decided not to include any videos of the Tower in action yet, as that’s what we’re currently working on right now. As soon as we’ve got the Tower-to-app communication protocols finished off I’ll be back with some footage showing the tower in motion.
In terms of project cadence, we’re doing pretty well considering the extra hurdles we’re all having to deal with right now. We have probably two more rounds of prototypes to make before the Tower is ready to move onto production. Alongside this the entire team will be running rigorous real-world gameplay tests to make sure the Tower, app and physical components all work together as best they can. Ensuring sound, light and movement are used to their fullest effect, to bring the experience alive. Carefully balancing player focus between the Tower, the app and the board. Building the app out to be the most polished, satisfying experience possible. Balancing the game design as Restoration does so well. Many levers to pull, many settings to tweak.
Return to Dark Tower is by Restoration Games.